How to Use the White Bread Grill Test to Grill Better Food

If there is a secret to grilling, it’s heat control. Learning when to use high heat to crisp things up and when to back off and use indirect heat is the foundation of great grilling. Of course, every grill is different, and we’ve never seen, nor do we want to see, a grill that delivers perfectly uniform heat across the entire grill; which is why it’s so important to test your grill.
Understanding where the hot and cool spots are on a grill allows you to cook different things at the same time and have them finish together. It also lets you use different techniques, such as searing and indirect heat in ways that let you grill a perfectly medium rare steak with a nice char on the outside without having to continually monkey with the grill.
There are lots of ways to learn how a grill delivers heat if you’ve got Warren Buffet money you could have a thousand monkeys grill a thousand filet mignon. If you’re like us and don’t even have Jimmy Buffet money, we recommend using the white bread grill test.
The white bread grill test is the easiest test you’ve taken since third grade, and at the end, you get a nice little heat map showing exactly where a grill runs hot, where it runs cold, and where the temperature is just right. It’s the kind of test Goldilocks dreams about.
For the white bread grill test, you’ll need a loaf of white bread, a timer, tongs, and a grill.
The reason we recommend using white bread for this test is because the way the bread changes color shows how much heat different parts of the grill get and because it’s the only thing we’ve found cheap white bread to be good for.
Light Up the Grill

Start by preheating the grill for ten minutes on high, then back the heat down to medium for another five minutes. The goal is to recreate, as much as possible, how the grill is usually used.
Once the grill is preheated, spread a single layer of bread across the grill, close the cover, and let the bread grill for 1 minute. When the timer is done, turn the burners off and flip the bread over in the same place it was on the grill. It helps if you flip the bread over in the same order you placed it on the grill to try and get as even cooking as possible.
White Bread Grill Test
Here is a breakdown of the steps for the white bread test:
Step 1: Preheat the grill for 10 minutes on high
Step 2: Turn the grill down to medium heat and let it run for 5 minutes
Step 3: Cover the grill in cheap white bread
Step 4: Lower the lid and grill the bread for 1 minute
Step 5: Turn the gas off and flip the bread over in the same place it was grilled
Step 6: Take a picture it lasts longer
Take a Picture It Lasts Longer
To get the most out of this test, take a few pictures to remember where the hot and cool spot are on your grill.
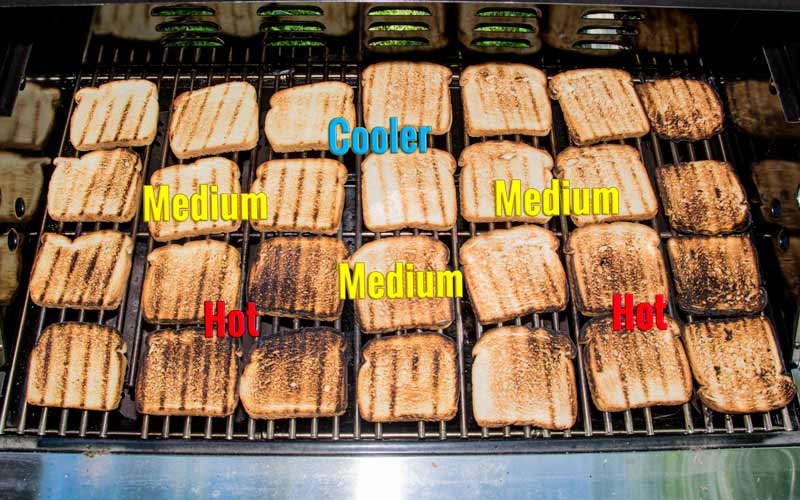
As you can see in the heat map, in the slideshow above, the grill produces a lot more heat towards the front of the grill than in the back, and there are a couple of spots towards the front where the burners put out more heat.
The heat map shows that if you want to sear something it should be placed towards the front of the grill and then moved backward as it cooks, to make sure it cooks evenly all the way through. It also shows that if you want to keep something warm without a lot of additional cooking it should go towards the back and center of the grill.
You can even get fancy and set the picture as the background on your phone or tablet, so you have easy access to the heat map anytime you’re grilling. As you use the grill, try cooking things in different areas, using the heat map as a guide to see what temperatures and locations work the best for different kinds of food.
The heat map’s real value is it gives you an overall picture of how a grill really works, which is a lot more effective than guessing and a big step toward better grilling.
Extra Credit
As with any good test, we’ve got some extra credit. When you finish the test, post a picture of your heatmap on Facebook and tag Umami with the type of grill you used so people can compare models.
Want to learn more about grilling, check out Umami’s Grilling section.

Mark is an experienced food writer, recipe developer, and photographer who is also Umami’s publisher and CEO. A passionate cook who loves to cook for friends, he can often be found in the kitchen or by the grill testing new recipes.
More Info About Mark Hinds


Leave a Reply